How to Use a Ninja Foodi Pressure Cooker
To use a Ninja Foodi pressure cooker, add liquid and food, lock the pressure lid, choose Pressure, set the time, and release pressure only after cooking ends. Keep the valve clear, avoid overfilling, and follow your model's manual for exact markings.
On this page (9 sections)
- What should you check before using a Ninja Foodi pressure cooker?
- How do you set up the pressure-cooking lid?
- Should you use Natural Release or Quick Release?
- What are good Ninja Foodi pressure cooker starter recipes?
- Which accessory helps with pressure-cooked meals?
- Can you crisp food after pressure cooking?
- Is a pressure cooker and air fryer combo easier?
- How do you clean a Ninja Foodi pressure cooker?
- What should you remember on your first cook?
To use a Ninja Foodi pressure cooker, add the required liquid, load the ingredients below the fill line, lock the pressure lid, select Pressure, set the time, and release pressure safely when cooking ends. For a similar routine with another electric cooker, see Instant Pot RIO instructions.
The exact buttons and lid design vary by Foodi model, so keep the model manual nearby for its markings and instructions.
Pressure cooking uses trapped steam to cook food quickly. The basic routine is simple, but the seal, liquid level, pressure valve, and release method all matter.
If you are considering preserving food, first learn the pressure cooker vs pressure canner distinction.
What should you check before using a Ninja Foodi pressure cooker?
Check the inner pot, sealing ring, pressure valve, and pressure lid before every use. The pot should sit correctly in the cooker, the sealing ring should be seated evenly, and the valve should move as your manual describes.
Remove food or residue from the lid area and steam-release parts. A blocked valve can affect pressure release, while a poorly seated ring can prevent the cooker from sealing.
Keep the cooker on a stable, heat-safe surface with room for steam to escape. Don't place your face or hands over the valve.
If you're comparing electric cookers before buying, our electric pressure cooker buying guide explains capacity, controls, lids, and everyday cooking needs.
How do you set up the pressure-cooking lid?
Put the ingredients and liquid in the inner pot, then lock the pressure lid according to the lid markings. The lid should close and lock without force.
Use water, broth, or another liquid approved by your recipe. Pressure cooking needs steam, so don't rely on a thick sauce alone unless the recipe specifically explains how to dilute it.
Keep ingredients below the Foodi's maximum fill line. Foods that expand, foam, or produce a lot of starch need extra room, so follow the manual's lower fill guidance for beans, grains, and similar foods.
How do you start the pressure-cooking cycle?
Select Pressure, set the cooking time, and choose the pressure level if your model offers more than one. The cooker may take time to build pressure before the countdown begins.
The display can remain in a preheating or pressurizing stage while the liquid heats. Don't open the lid during this stage, and don't move the pressure valve unless the recipe calls for a release.
When the cooking cycle finishes, the Foodi will usually beep or change its display. The food may still be under pressure, so the cooking process is not complete until the pressure indicator drops.
Should you use Natural Release or Quick Release?
Use Natural Release for foods that benefit from resting or that foam easily, and Quick Release when the recipe directs a faster pressure drop. Always wait until the pressure indicator falls before opening the lid.
Natural Release means leaving the valve closed while pressure decreases gradually. This works well for many meats, beans, soups, and dishes where a sudden release could make liquid spray.
Quick Release means carefully moving the valve to vent after cooking. Steam can escape forcefully, so keep your face, hands, and kitchen towels away from the opening.
Never force the lid open. If it remains locked, pressure is still present or the cooker has not completed its safety process.
What are good Ninja Foodi pressure cooker starter recipes?
Start with simple recipes that use a clear amount of liquid and a short ingredient list. Rice, broth, beans, shredded chicken, and tender vegetables help you learn timing without managing several cooking stages.
For rice, use a recipe written for your exact Foodi model because rice varieties and liquid ratios differ. For chicken, use enough liquid to build pressure, then check the thickest piece with a food thermometer before serving.
You can also explore Ninja Foodi pressure cooker recipes for recipe ideas. Look for recipes that explain the pressure level, release method, liquid amount, and ingredient quantity.
The phrase “Ninja Foodi Pro pressure cooker recipes” may refer to recipes for a particular Foodi Pro model. Match the recipe to your cooker's capacity and controls instead of assuming every Foodi uses the same settings.
Which accessory helps with pressure-cooked meals?
The most useful accessory depends on whether you need another cooking vessel, a crisping step, or compatible replacement cookware. Check your Foodi model before buying accessories because pressure lids, inner pots, and baskets are not universal.
For readers who use a compatible 6-quart Instant Pot rather than a Ninja Foodi, the Instant Pot Stainless Steel Inner Cooking Pot has a 6-quart capacity, food-grade 304 stainless steel, a polished surface, handles, and a flat base. It is designed for the Instant Pot Pro 60, Pro Plus, Pro Max, and Duo Evo Plus 60.
Its stainless steel surface has no chemical coating and is dishwasher safe. Confirm your exact cooker model before ordering, since this pot is designed only for the compatible Instant Pot models named above.
Can you crisp food after pressure cooking?
Yes, some pressure-cooker meals can be finished with an air-frying or crisping step, but a separate air fryer does not replace the pressure-cooking function. For guidance on pressure cookers and frying chicken, see pressure cooker chicken frying.
Dry the food's surface first, use a suitable basket, and follow the appliance's temperature and loading instructions.
The Instant Pot VORTEX Plus 6QT XL Air is a 6-quart, 1700-watt stainless steel air fryer with air fry, bake, roast, broil, dehydrate, and reheat functions. Its temperature range is 95°F to 400°F, and it is designed for up to 6 portions.
This appliance suits readers who already have a pressure cooker and want a separate tool for crisp finishes. It does not provide the same pressure-cooking setup as a Ninja Foodi pressure cooker.
For a single appliance that combines both methods, compare the best pressure cooker and air fryer options.
Is a pressure cooker and air fryer combo easier?
A combo cooker can save counter space by combining pressure cooking and air frying, but it may have more parts and a larger footprint. Check which lid, basket, rack, and pot the recipe needs before starting.
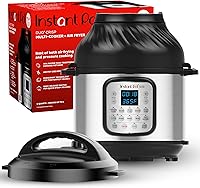
The Instant Pot Duo Crisp 8 Qt 11-in-1 is an 8-quart stainless steel appliance with pressure cook, air fry, slow cook, sauté, steam, sterilize, warm, rice, roast, bake, and dehydrate functions. It includes a pressure cooker lid, air fryer lid, stainless steel inner pot, air fryer basket, basket base, steam rack, broil and dehydrator tray, protective pad, and storage cover.
The 8-quart capacity suits batch cooking and meals for up to 8 servings. Its air-fry temperature range is 70°F to 450°F, while the pressure-cooking side is useful for soups, beans, rice, and tender meats.
The trade-off is size and setup. You need to store and use two lids, and the cooker weighs 22.2 lb.
If you are comparing pressure and crisping systems, our guide to Instant Pot Pro vs Instant Pot Pro Crisp covers a similar decision.
How do you clean a Ninja Foodi pressure cooker?
Unplug the cooker, let every part cool, and clean the removable parts according to the manual. Pay close attention to the sealing ring, pressure valve, lid area, and inner pot.
Wash away food residue before it dries. Check the ring for lingering odors or damage, and replace parts only with ones made for your model.
Don't submerge the cooker base or pour water into its controls. Wipe the base with a damp cloth and dry it before storing.
For more accessory ideas, see our guide to best Ninja Foodi pressure cooker accessories. If you are researching pressure cooking for other tasks, you may also need advice about a stainless steel pressure cooker for canning or Presto pressure cooker parts 409A.
What should you remember on your first cook?
Use the correct liquid, stay below the fill line, lock the lid fully, and wait for the pressure indicator to drop before opening. Start with a recipe that gives exact timing and release instructions for your Foodi model.
Choose separate air-frying equipment if you mainly want crisp food after pressure cooking. Choose a combo cooker if you want one 8-quart appliance with both pressure and air-frying functions.
Choose a replacement inner pot only after confirming model compatibility.
The safest routine is also the simplest: inspect the parts, follow the recipe, keep clear of escaping steam, and let the cooker finish its pressure-release process before serving.
Frequently asked questions
How much water do you put in a Ninja Foodi pressure cooker?
Use the liquid amount required by your Ninja Foodi model and recipe, usually enough to create steam without exceeding the pressure cooker's maximum fill line. Add broth, water, or another approved cooking liquid, and remember that thick sauces may not create steam properly unless diluted.
How do you release pressure from a Ninja Foodi?
Use Natural Release by leaving the valve closed until the pressure drops on its own, or use Quick Release by carefully moving the valve to vent after cooking. Keep your hands and face away from the steam, and wait until the pressure indicator drops before opening the lid.
Can you put frozen meat in a Ninja Foodi pressure cooker?
Yes, many pressure-cooker recipes start with frozen meat, but cooking time and liquid needs vary by cut and thickness. Separate pieces when possible, follow a tested recipe for the food, and confirm that meat reaches a safe internal temperature before serving.
What is the first thing to cook in a Ninja Foodi?
A simple first recipe is a small batch of broth, beans, rice, or shredded chicken because these foods show how pressure builds, cooks, and releases. Start with a recipe written for your Foodi model, stay below the fill line, and inspect the seal before cooking.