How to Use a NESCO Vacuum Sealer
To use a NESCO vacuum sealer, place a clean bag in the channel, choose dry or moist mode, vacuum, and heat seal the edge. Check that the seal is flat and airtight, then label and store the bag.
On this page (12 sections)
- What controls should you check before you seal?
- How do you prepare bags for a NESCO vacuum sealer?
- How do you use the NESCO vacuum sealer step by step?
- When should you use dry or moist mode?
- How do you seal liquids, sharp foods, and delicate foods?
- How do you store vacuum sealed food safely?
- How do you clean and maintain a NESCO vacuum sealer?
- How do you choose between a NESCO sealer and another vacuum sealer?
- How do you decide if vacuum sealing is better than freezer bags?
- How does the NESCO VS-12 compare with other NESCO models?
- How can you get a strong seal every time?
- Which products help you practice these NESCO sealing steps?
To use a NESCO vacuum sealer, place a clean bag in the channel, choose dry or moist mode, vacuum, and heat seal the edge. Check that the seal is flat and airtight, then label and store the bag.
That routine covers most everyday NESCO models, but controls and lid design change by model. Our detailed Nesco VS-12 Deluxe Vacuum Sealer Review explains one common setup for owners of that model.
What controls should you check before you seal?
Check the vacuum and seal switches, the lid latch, and the bag channel before you add food. Most NESCO models use a dry or moist switch and a vacuum and seal button, but labels differ by model.
Look at the sealing strip for crumbs or melted plastic. Wipe it only when cool and unplugged, with a soft dry cloth.
Check the foam gasket around the channel for crumbs, cracks, or uneven spots.
Set the machine on a level counter with room to close the lid. Keep the cord away from water and heat.
If your model has a drip tray or accessory port, confirm it is seated correctly. Place the open bag end flat in the channel, not folded, wet, twisted, or pushed too far in.
How do you prepare bags for a NESCO vacuum sealer?
Cut or select a bag that leaves room for the seal, food shrinkage, and a label. A bag that is too short can pull food into the sealing area.
For rolls, cut a piece about 3 to 5 inches longer than the food. Seal one end first if it is not already sealed.
For pre-cut bags, choose a size that lets food lie fairly flat. Leave about 1 to 2 inches of empty bag near the opening where possible.
Add food without packing it against the seal area. Smooth the opening and wipe liquid or crumbs from the inside edge, and blot juicy food dry.
Rolls suit large roasts and portioned meals. For bags you can use again, compare reusable vacuum sealer bags.
Pre-cut bags are faster for shared household foods because you avoid cutting and sealing a first edge.
How do you use the NESCO vacuum sealer step by step?
Put the bag in the channel, close the lid, select the food mode, vacuum, and seal. Follow the labels on your model rather than a generic button order.
Start with the machine plugged in and the lid open. Lay the open bag end flat across the vacuum channel, with food kept away from the channel and the edge straight.
Close the lid until the latch clicks. Choose dry mode for foods that release little liquid, or moist mode for foods that may bubble or draw liquid toward the seal.
Press vacuum and seal, then wait for the cycle and indicator light to finish before opening the lid. Remove the bag, check the seal as it cools, and label it before refrigerating or freezing.
When should you use dry or moist mode?
Use dry mode for foods with little liquid and moist mode for foods that can bubble or leak liquid. Match the setting to the food so air removal and sealing work properly.
Dry mode suits nuts, coffee beans, dry beans, flour, frozen vegetables, bread, hard cheese, and dry snacks. These foods release little liquid while vacuuming.
Moist mode suits soups, stews, sauces, marinated meat, berries, and cooked vegetables. These foods can foam or move toward the seal as air leaves.
A short pause lets liquid settle. If liquid reaches the seal area, clean the edge and reseal on a clean section, since liquid weakens the bond.
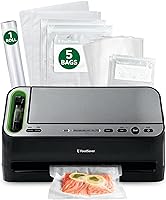
The FM2100 shows why the choice matters. Its dual heat sealing strips aim for a consistent seal, and its built-in cutter helps you make a custom bag for wet or bulky foods.
How do you seal liquids, sharp foods, and delicate foods?
Protect the seal area from liquid, sharp points, and pressure before you start. A small prep step prevents most failed seals.
For soup or sauce, freeze it flat in a shallow container first, then transfer the frozen block to a bag. This keeps liquid away from the seal and makes storage neater.
For sharp foods such as bones or shells, wrap the food or cover points with plastic wrap or bag material. For berries, chips, and baked goods, use partial vacuuming if your model offers it.
Full vacuum can crush delicate foods.
If you are comparing machines for these foods, our best automatic vacuum sealer for food guide compares automatic controls.
How do you store vacuum sealed food safely?
Label every bag, cool it promptly, and store it at the right temperature. Vacuum sealing removes air, but it does not make perishable food shelf stable.
Write the food name, packing date, and use-by date on each bag so you use older food first.
Refrigerate cooked foods, leftovers, marinated meats, and produce that needs refrigeration. Freeze meat, poultry, seafood, soups, and prep-ahead meals, and keep dry pantry foods in a cool, dark place.
Do not store home vacuum sealed garlic in oil or low-acid vegetables at room temperature unless a reliable source calls for that exact method. Our guide to best vacuum sealer bags for foodsaver explains thickness, roll sizes, and compatibility.
How do you clean and maintain a NESCO vacuum sealer?
Clean the channel, gasket, and sealing strip after spills or failed seals. Regular cleaning keeps the machine sealing well.
Unplug the machine and let it cool before cleaning. Remove crumbs from the channel with a dry brush, wipe the gasket with a damp cloth and mild soap, then dry it fully.
Clean the sealing strip with a soft cloth. Do not scrape it with a knife or use abrasive pads, and check the cutter for stuck plastic.
Keep rolls and bags away from heat and direct sun. If seals weaken, check the gasket, strip, bag material, and liquid on the edge before replacing parts.
If a component needs replacing, see NESCO vacuum sealer replacement parts.
The V4400 is a useful comparison because automatic moisture detection and a drip tray show how modern sealers handle wet foods. A NESCO model may use manual controls instead.
How do you choose between a NESCO sealer and another vacuum sealer?
Choose a NESCO sealer if you like manual dry and moist controls and a straightforward setup. For a portable alternative, read the FoodSaver handheld sealer review.
Choose another model if you need chamber sealing, accessory ports, or a different bag system.
A NESCO external sealer suits households sealing meat, vegetables, leftovers, and bulk pantry foods with rolls or pre-cut bags. A chamber sealer handles liquids more directly but takes more space and costs more.
Our guide to best commercial chamber vacuum sealers suits readers sealing large batches. Our best foodsaver vacuum sealer guide covers FoodSaver controls and bag detection, and the food vacuum sealer guide explains bag types, seal strength, and size.
How do you decide if vacuum sealing is better than freezer bags?
Use a vacuum sealer when you want to remove air for longer freezer storage and neater portions. Use freezer bags for low cost, short storage, or foods you will use soon.
Vacuum sealing helps with bulk meat, prepared meals, smoothie packs, and pantry portions, and reduces air that can cause freezer burn. Our comparison of vacuum sealer vs freezer bags explains cost, space, and quality trade-offs.
Freezer bags still work for marinades and fries, and you can press out air by hand. You cannot remove as much air as a sealer can.
If you buy meat in bulk or prep meals, a sealer saves time. Small amounts and rare freezing may need only a basic bag.
How does the NESCO VS-12 compare with other NESCO models?
Check the VS-12 controls, lid design, and bag channel before you follow steps for another model. Small differences can change button order and bag loading.
The VS-12 is a good example of model specific instructions. Our step guide for the how to use nesco vacuum sealer vs-12 covers that model in more detail.
Compare switch labels, indicator lights, and latch style on your machine with the VS-12 guide. If a control looks different, use your manual for that control.
Keep the same core habits across models. Use a clean, flat bag edge, leave space between food and the seal, and check the seal after it cools.
How can you get a strong seal every time?
Keep the bag edge clean, flat, and dry, then check the seal before storage. Most failed seals trace back to prep, not the machine alone.
Leave extra bag length at the open end. Smooth the edge in the channel, keep food away from the seal strip, and wipe liquid from inside the bag before closing the lid.
Vacuum until the bag tightens around food without crushing it. For moist foods, pause before sealing if your model allows it, then heat seal and let the edge cool.
Run your finger along the seal and look for gaps, wrinkles, or wet spots. If it fails, cut off the bad section and seal again on a clean area.
Which products help you practice these NESCO sealing steps?
Pick a sealer or bag that matches the foods you seal most often. The right accessory can make the same steps faster and neater.
Choose the FoodSaver FM2100 for a compact automatic sealer with one-touch sealing and a built-in roll cutter. It suits dry and moist foods, everyday storage, and sous vide prep.
Choose the FoodSaver V4400 for automatic bag detection, a removable drip tray, and a handheld option for zipper bags and containers. It suits readers who seal wet foods and want moisture handling built in.
Choose FoodSaver Custom Fit rolls for large roasts, whole birds, or custom portions. The 11 inch width and 16 foot length give room to cut a bag that fits.
Frequently asked questions
How do I use a NESCO vacuum sealer for the first time?
Place the machine on a flat counter, press the open end of a compatible bag flat into the vacuum channel, close the lid, and select dry or moist mode for your food. Vacuum until most air is removed, then heat seal and check the full edge for a flat, continuous seal before labeling.
Should I use dry or moist mode on a NESCO vacuum sealer?
Use dry mode for foods that release little liquid, such in Phil? Use dry mode for foods that release little liquid, such as nuts, dry beans, and frozen bread.
Use moist mode for soups, sauces, marinated foods, and other foods that may bubble or draw liquid toward the seal area.
Why does my vacuum sealed bag fail to seal?
A weak seal often comes from liquid, crumbs, wrinkles, or food on the sealing strip. Wipe the bag edge clean and dry, flatten the edge in the channel, leave enough space between food and the seal, and run the heat cycle again on a fresh area if needed.