How Long To Air Fry Duck Breast?
To air fry duck breast, you’re generally looking at 12-18 minutes at 375°F (190°C) for medium-rare to medium, flipping halfway through.
The exact air frying time for duck breast depends on its thickness and your desired doneness, so always use a meat thermometer.
- Air fry duck breast at 375°F (190°C) for 12-18 minutes, achieving delicious results.
- Always flip the duck breast halfway through to ensure even cooking and beautifully crispy skin.
- Get that coveted crispy skin by scoring it properly before cooking and starting skin-side down.
- Let your duck breast rest for 5-10 minutes after cooking; this keeps it wonderfully juicy.
- Use a meat thermometer to target 135-140°F for a perfect medium-rare doneness.
How Long To Air Fry Duck Breast?
Achieving a perfectly cooked duck breast in your air fryer typically takes about 12 to 18 minutes. This range is ideal for a juicy medium-rare to medium doneness, which many people prefer.
Remember, the thickness of your duck breast and how crispy you want the skin will influence the exact time. Think of your air fryer as a powerful mini-oven, ready to work its magic.
Why Air Frying Duck Breast Works Wonders
Have you ever wanted restaurant-quality duck breast at home without the fuss? Your air fryer makes this surprisingly simple. It circulates hot air, cooking the duck evenly and quickly, which is fantastic.
Many home cooks find this method less messy than pan-frying, too. You get less oil splatter, and the cleanup is often a breeze, leaving you more time to enjoy your meal.
The Magic of Crisp Skin
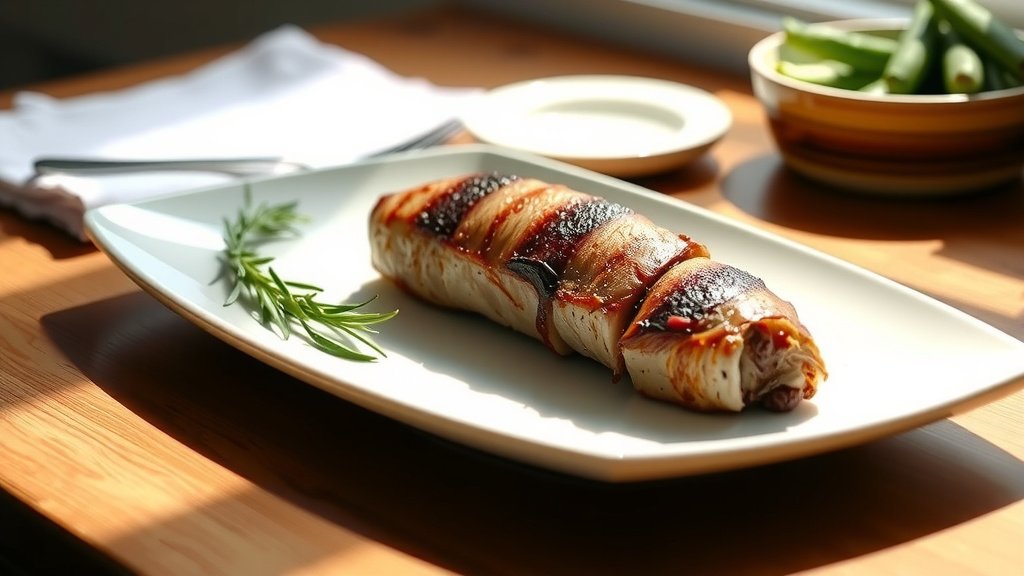
The real star of air-fried duck breast is often its skin. The intense, circulating heat of the air fryer renders the fat beautifully, creating an incredibly crispy, golden-brown crust. It’s truly satisfying.
This crispiness provides a delightful contrast to the tender, flavorful meat underneath. It’s what transforms a good dish into a truly memorable one for your dinner guests (or just you!).
Before You Begin: Preparing Your Duck Breast
Prepping your duck breast properly is the first step to success. It’s like setting the stage for a great performance. A little effort here goes a long way in getting perfect results.
We’ve found that taking these simple steps ensures you get that delicious crispy skin and evenly cooked meat every time you air fry. It’s worth those few extra minutes, trust us.
Scoring the Skin: A Game Changer
Before cooking, you must score the duck skin. Use a sharp knife to make shallow, diagonal cuts across the skin in a crisscross pattern, being careful not to cut into the meat. This is a key technique.
Scoring helps the fat render out more efficiently, leading to extra crispy skin and less greasy duck. Many chefs agree this small step makes a big difference in both texture and taste (Food Network).
Seasoning for Success
Once scored, pat the duck breast very dry with paper towels. This step is crucial for crispy skin. Then, generously season both sides with salt and pepper, or your favorite duck seasoning blend.
Some people like to add garlic powder, thyme, or paprika for extra flavor complexity. Don’t be shy with the seasoning; it penetrates the meat and enhances the overall taste.
The Air Frying Process: Step-by-Step
Now comes the fun part: cooking your duck breast! The air fryer makes this process quite straightforward. Just follow these steps, and you’ll have a fantastic meal ready in no time.
We’ve broken it down to make it super easy for you to achieve that perfect crispy skin and juicy interior. It’s all about getting the timing and temperature just right.
Setting the Temperature Right
Preheat your air fryer to 375°F (190°C) for about 5 minutes. This ensures the duck starts cooking in an already hot environment, which helps with crisping and even cooking. Don’t skip this.
Starting with a preheated air fryer is like preheating your oven; it’s a small step that makes a big impact on the final texture and taste of your duck breast. Many experts suggest this for consistency.
Starting Skin-Side Down
Place the seasoned duck breast, skin-side down, into the preheated air fryer basket. Ensure there’s enough space around the duck for air to circulate; avoid overcrowding the basket.
Cook skin-side down for about 8-10 minutes. This initial phase is where most of the fat renders out, creating that wonderful, crispy skin we all love. You’ll see it bubble and brown nicely.
Flipping and Finishing
After the initial cooking, carefully flip the duck breast over. Now, the meat side should be facing down. Continue to air fry for another 4-8 minutes, depending on your desired doneness.
This second cooking phase finishes the duck and ensures the meat cooks through evenly. Keep an eye on it, as air fryer models can vary slightly in their cooking power and speed, so check frequently.
Doneness and Temperature Check
To accurately check if your duck breast is done, always use a reliable meat thermometer. Insert it into the thickest part of the meat, avoiding any bone or fat pockets. This gives you the true internal temperature.
For medium-rare, aim for 135-140°F (57-60°C). For medium, target 140-145°F (60-63°C). Remember, the temperature will rise slightly as the duck rests, so pull it a few degrees before your target.
Mastering Your Air Fryer for Duck Breast
Getting the hang of your air fryer for different foods is an adventure. Duck breast can be a bit tricky initially, but with a few simple tricks, you’ll become a pro. It’s all about practice and a few key pointers.
We often find that small adjustments make a huge difference in achieving restaurant-quality results at home. Don’t be afraid to experiment a little after you understand the basics.
Rest Your Duck: The Secret to Juiciness
Once your duck breast reaches its desired internal temperature, remove it from the air fryer immediately. Place it on a cutting board, tent it loosely with foil, and let it rest for at least 5-10 minutes.
This resting period is incredibly important. It allows the juices to redistribute throughout the meat, resulting in a much more tender and flavorful duck breast. Skipping this step often leads to dry duck.
Troubleshooting Common Duck Breast Issues
Sometimes things don’t go perfectly, and that’s okay! We’ve all been there. Understanding common problems can help you fix them next time, making you a more confident cook.
The beauty of cooking is learning from each attempt. Don’t let a minor setback discourage you; instead, see it as an opportunity to refine your air frying skills for delicious duck breast.
Skin Not Crispy Enough?
If your duck skin isn’t as crispy as you’d like, consider these points. Did you score it deeply enough without cutting into the meat? Was it patted completely dry before seasoning?
Also, ensure your air fryer wasn’t overcrowded. More space means better air circulation, which is key for crisping. You can always give it another 1-2 minutes, skin-side up, at 400°F (200°C) to crisp it further.
Overcooked or Dry?
An overcooked duck breast usually comes down to two things: cooking too long or at too high a temperature. Remember, duck cooks relatively quickly in an air fryer. Always use a meat thermometer.
Pulling the duck breast a few degrees before its target temperature and letting it rest also helps prevent dryness. The carryover cooking during resting will bring it to the perfect final doneness.
Cooking Times at a Glance
Here’s a quick guide to help you estimate your cooking times. These are general guidelines, so always adjust based on your specific duck breast and air fryer model, and always use a thermometer.
| Doneness | Internal Temperature | Approx. Air Fry Time (at 375°F/190°C) |
|---|---|---|
| Medium-Rare | 135-140°F (57-60°C) | 12-14 minutes |
| Medium | 140-145°F (60-63°C) | 14-16 minutes |
| Medium-Well | 145-150°F (63-66°C) | 16-18 minutes |
Essential Tips for Perfect Air Fryer Duck Breast
Want to guarantee perfection every time? We’ve compiled a quick checklist of vital tips that seasoned air fryer users swear by. These small details can make a world of difference.
- Always preheat your air fryer before adding the duck breast.
- Score the duck skin generously but avoid cutting into the meat.
- Pat the duck breast thoroughly dry before seasoning and cooking.
- Start cooking skin-side down to render fat and crisp the skin.
- Use a meat thermometer to ensure accurate doneness, not guessing.
- Rest the cooked duck breast for 5-10 minutes before slicing.
Conclusion
Air frying duck breast is a fantastic way to achieve tender, juicy meat with wonderfully crispy skin right in your kitchen. It’s a process that combines simplicity with truly gourmet results, making it accessible to everyone.
By following these steps—from proper scoring and seasoning to careful temperature monitoring and crucial resting—you’re well on your way to mastering this delightful dish. Enjoy your perfectly air-fried duck breast!
How do I get really crispy duck skin in an air fryer?
To achieve really crispy duck skin, start by scoring the skin deeply in a crisscross pattern without cutting into the meat. Pat the duck breast very dry with paper towels, then place it skin-side down in a preheated air fryer at 375°F (190°C) for the first 8-10 minutes. This allows the fat to render effectively, resulting in a golden, crispy skin.
Can I air fry frozen duck breast?
It’s generally not recommended to air fry duck breast from frozen. For best results and food safety, always thaw your duck breast completely in the refrigerator before preparing and air frying it. Thawing ensures even cooking and allows for proper fat rendering and skin crisping.
What internal temperature is considered safe for duck breast?
While duck breast can be safely eaten at medium-rare, aiming for an internal temperature of 135-140°F (57-60°C) for medium-rare to 140-145°F (60-63°C) for medium is generally considered safe and yields the most tender results. Always use a meat thermometer inserted into the thickest part of the breast to confirm doneness.
Do I need to add oil when air frying duck breast?
No, you typically do not need to add extra oil when air frying duck breast. Duck fat renders out naturally during the cooking process, which helps to crisp the skin and moisten the meat. Adding oil can make the duck too greasy and prevent the skin from getting as crispy as desired.
What should I serve with air-fried duck breast?
Air-fried duck breast pairs wonderfully with a variety of sides. Consider serving it with roasted vegetables like asparagus or Brussels sprouts, a creamy potato gratin, a simple green salad with a vinaigrette, or a fruit-based sauce like cherry or orange reduction to complement its rich flavor.